
Using the repository
Any code that you want to be included into PsychoPy® is done via Git in the GitHub repository. There’s something of a learning curve to this, but it’s common to development in many other packages.
For developers experienced with Git from other projects the only things you need to note are:
the PsychoPy Git Flow for branches (which does not have a master or main but two branches, dev and release). Please use the `release` branch as the base for bug fixes and the `dev` branch for feature development.
the format of PsychoPy commit messages is important so that we can see what changes have been made from a quick view of the git log
If your copy of the repository comes from before we used the 2-trunk GitFlow then you may also want to read the Converting to the 2-trunk flow section to update your repository to the new structure.
If you’re new to git and/or contributing to open-source projects then you may want to go through as below:
fixBugs
If you’re really new to contributing you might want to walk through the steps in our Making edits to PsychoPy’s documentation page to make a small change before trying out a bigger one!
PsychoPy Git Flow
Unlike many projects, the PsychoPy repository has TWO main branches, dev and release (since Feb 2021). The design is similar to the GitFlow workflow except that we do not have anything named master (that is effectively now called release).
The system is designed to support our release pattern, with “feature releases” 2 or 3 times per year and bug-fix releases several times for each feature release. Major changes to the code, that potentially include new bugs, should not be included in bug-fix releases. So then the two main branches are as follows.
The dev branch: is for work that is going to be held back for the next feature release. Only fix bugs here if they are related to other un-released code or if the fixes require substantial code changes that might introduce new bugs. Those larger fixes will probably be held back for the next feature release. Simple bug fixes that get based on the dev branch might be hard to reincorporate back into the release branch .
The release branch: is for fixes that need to be included in the next release. It includes code changes that do not knowingly break/change existing experiments, and are small enough that we can be relatively confident that they do not introduce new bugs. Do not use this trunk for substantial pieces of development where new bugs might be introduced.
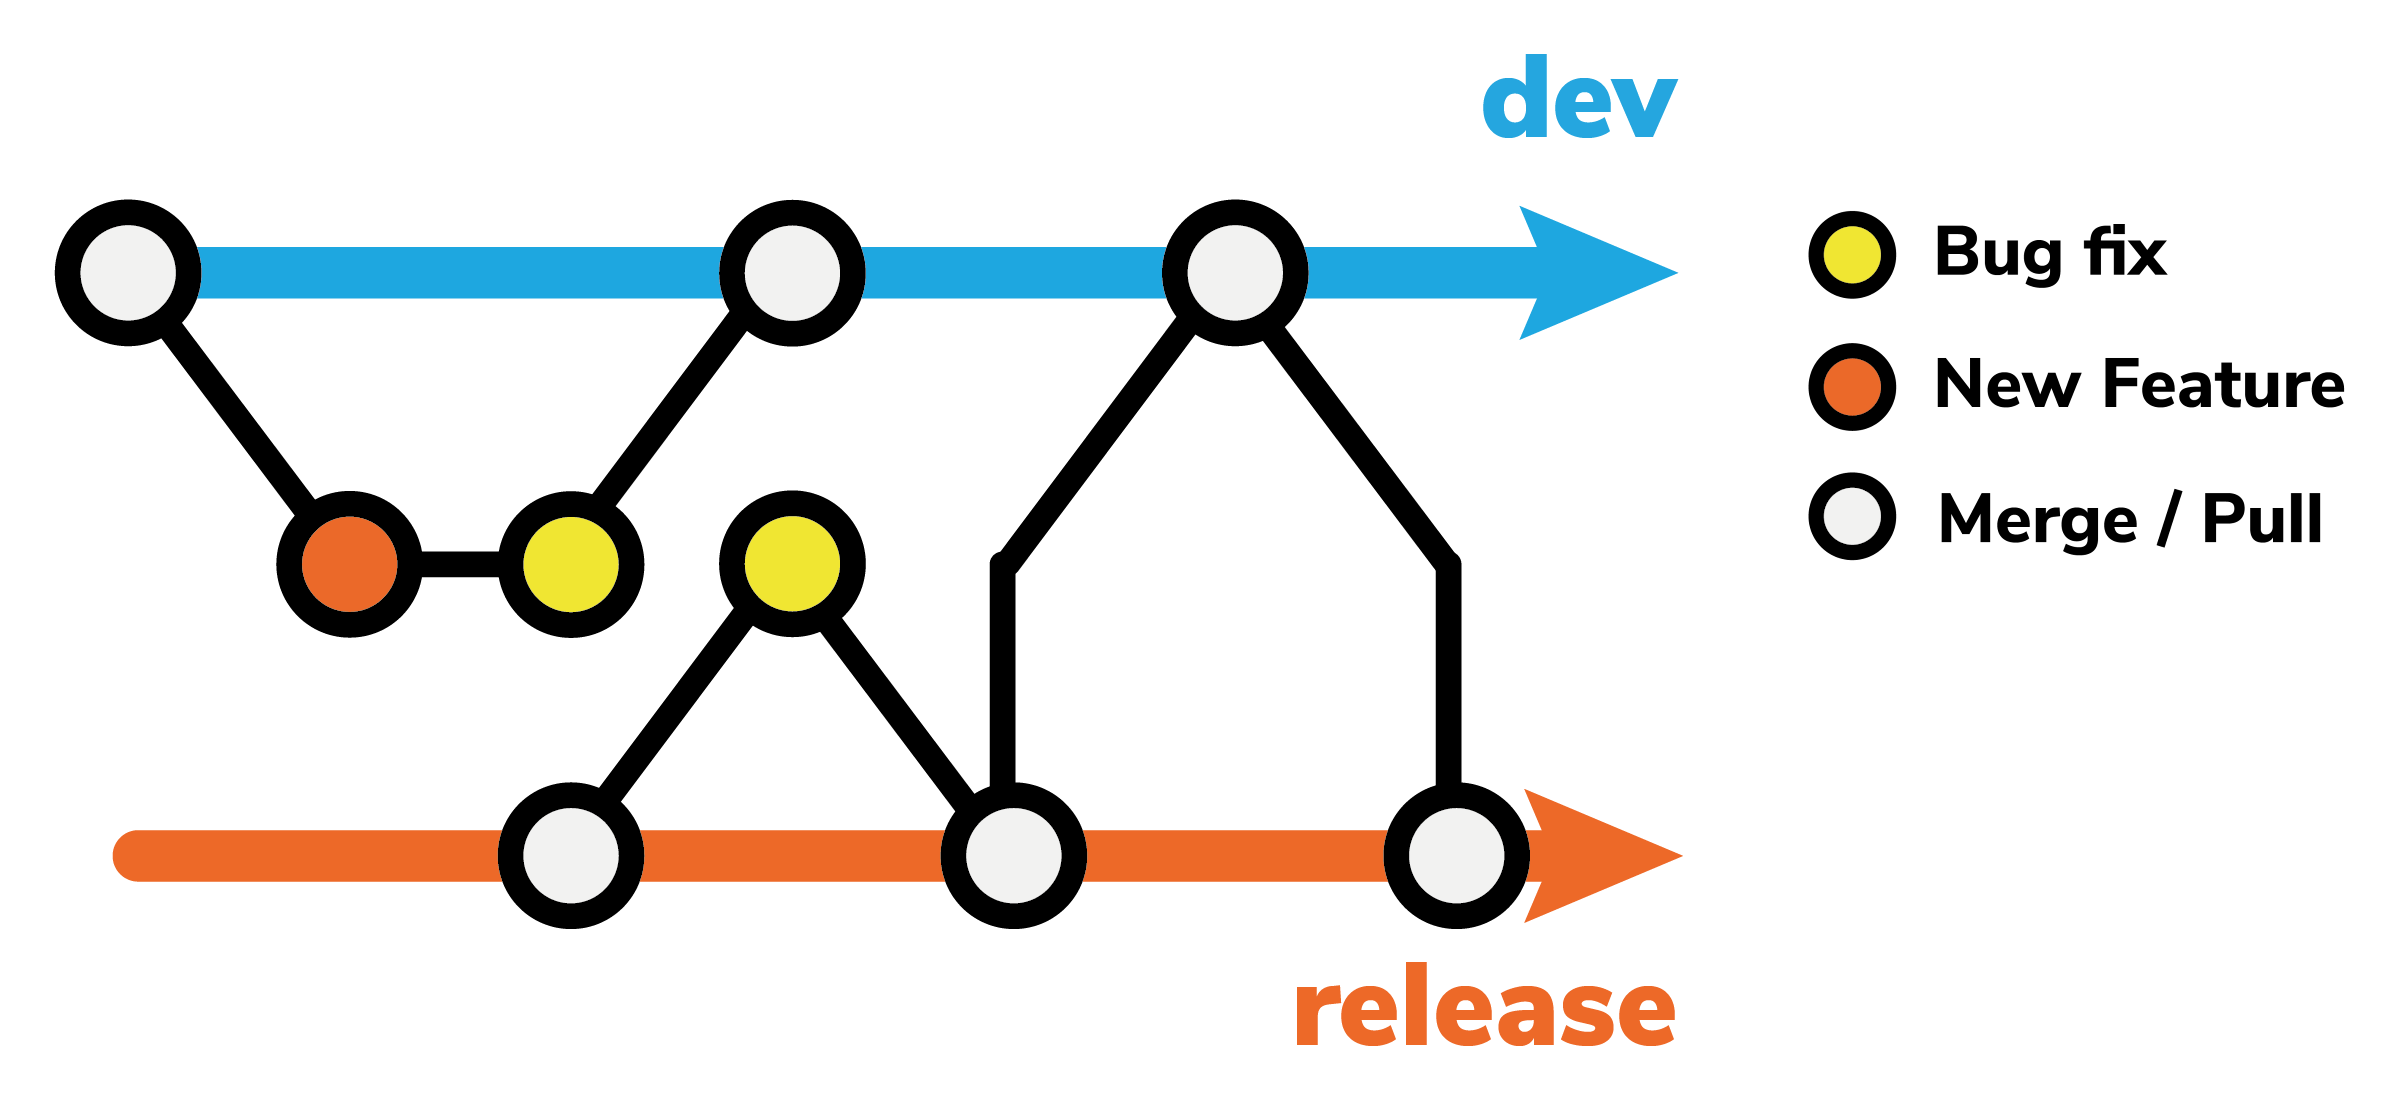
Git Flow used by the PsychoPy project, with 2 main trunks for ‘dev’ and ‘release’. Bug fixes should be based on the release branch while new features or substantial code changes are built on the dev branch
Always create a branch for the work you are doing and take that branch from the tip of either dev or release.
Around a major (feature) release the two trunks will generally become synchronised.
PsychoPy commit messages
Informative commit messages are really useful when we have to go back through the repository finding the time that a particular change to the code occurred. Precede your message with one or more of the following:
BF : bug fix
FF : ‘feature’ fix. This is for fixes to code that hasn’t been released
RF : refactoring
NF : new feature
ENH : enhancement (improvement to existing code)
DOC: for all kinds of documentation-related commits
TEST: for adding or changing tests
When making commits that fall into several commit categories (e.g., BF and TEST), please make separate commits for each category and avoid concatenating commit message prefixes. E.g., please do not use BF/TEST, because this will affect how commit messages are sorted when we pull in fixes for each release.
NB: The difference between BF and FF is that BF indicates a fix that is appropriate for back-porting to earlier versions, whereas FF indicates a fix to code that has not been released, and so cannot be back-ported.
So, a good commit message looks something like this. Note a) the commit title tells us what was fixed, the message tells us how that was achieved and includes a link to the GitHub issue if possible.
BF: fixed the updating of the stimulus position when units='deg'

The problem turned out to be that we had a typo in the attribute name

fixes GH-12323  [causes that GitHub issue to be closed and links them]
Setting up your repository first time
When you first start using the repo there are a few additional steps that you won’t need to do afterwards.
Create your own fork of the central repository
Go to github, create an account and make a fork of the psychopy repository You can change your fork in any way you choose without it affecting the central project. You can also share your fork with others, including the central project.
Fetch a local copy
Install git on your computer. Create and upload an ssh key to your github account - this is necessary for you to push changes back to your fork of the project at github.
Then, in a folder of your choosing fetch your fork:
$ git clone git@github.com:USER/psychopy.git
$ cd psychopy
$ git remote add upstream git://github.com/psychopy/psychopy.git
The last line connects your copy (with read access) to the central server so you can easily fetch any updates to the central repository.
Run PsychoPy® using your local repo copy
Now that you’ve fetched the latest version of psychopy using git, you should run this version in order to try out yours/others latest improvements. To use your github version all the time you should install that as a “developer” install so that the files stay in this location and as they get updated that is reflected in the installed version. This differs from a standard install where the files get copied to Python’s site-packages and then changes you make have no effect until you install again. To run the developer install choose one of:
python -m pip install -e .     # to include the dependencies
python -m pip install -e --no-deps .     # to skip installing the dependencies
Run git version for just one session (Linux and Mac only): If you want to switch between a standard install and a development version from git you can choose to only temporarily run the git version. Open a terminal and set a temporary python path to your psychopy git folder:
$ export PYTHONPATH=/path/to/local/git/folder/
To check that worked you should open python in the terminal and try to import psychopy and see if it’s the version you expected:
$ python
Python 3.8.10 (v3.8.10:3d8993a744, May  3 2021, 08:55:58)
[Clang 6.0 (clang-600.0.57)] on darwin
Type "help", "copyright", "credits" or "license" for more information.
>>> import psychopy
>>> print(psychopy.__version__)
2021.1.0
>>>
Fixing bugs and making minor improvements
To fix a bug in the main code, checkout the release trunk, create and checkout a new branch, then commit and push to your repo:
$ git checkout release
$ git checkout -b hotfix-whatAreYouFixing
     <do coding here and commits here>
$ git push origin release
Remember to use good commitMessage for your changes.
Working on a new feature
All substantial changes should be made on their own branch, coming from the dev trunk. Don’t mix quick fixes with substantial changes with quick fixes (or with substantial changes on another topic). All changes should have their own branch so that we can then pick which ones we want to include and when.
To create a new branch:
$ git checkout dev  # start from the tip of the dev trunk
$ git pull upstream dev  # make sure we're up to date before we start
$ git checkout -b feature-somethingNew  # create and checkout our new branch
<do coding here and commits here>
$ git push origin feature-somethingNew
Remember to use good commitMessage for your changes.
Once you’ve folded your new code back into your master and pushed it back to your github fork then it’s time to Making a pull request.
Making a pull request
Once you’ve pushed your branch to your repository you can make a pull request from GitHub. If you go to your GitHub page for the repo it should be presenting you with a message explaining that there is new activity on the branch you just pushed, and that yo umight want to create a Pull Request. It’s fairly simple form there. The rules about good commit messages don’t even really reply to the Pull request itself, because it can be changed later more easily.
Converting to the 2-trunk flow
If you have an older copy of the repository with a master branch then you will need to follow these steps to get back in sync with the new PsychoPy Git Flow:. If you don’t yet have a fork then don’t worry - just go to Setting up your repository first time.
Update your fork on GitHub (if you haven’t done that already): Visit https://github.com/<yourUsername>/psychopy/branches and select the pen next to master to rename it as release
Update your local branches to match the remote release trunk:
git branch -m master release  # rename your local master to be release
git fetch origin  # fetch the branches from your own remote
git branch -u origin/release release  # set your renamed release to track origin/release
3a. EITHER If you don’t have a dev branch on your origin fork (i.e. first time you switch):
git fetch upstream  # to get the dev branch from there
git checkout -b dev --track upstream/dev  # create and checkout local dev from upstream
git push -u origin dev
3b. OR If you already have a dev branch on your personal fork (e.g. you’ve converted another machine already):
git fetch origin  # to get the dev branch from origin
git checkout -b dev --track origin/dev  # create and checkout local dev from upstream