Launch your study on Pavlovia.org
Pavlovia.org is a site created by the PsychoPy team to make it easy to:
run studies online
host your experiments securely and easily without knowing about server technologies
share studies with other scientists with collaborators of publicly (and find public studies shared by others)
version control your work (using Git)
Site licenses and credits purchased from Pavlovia® also provide a source of revenue to sustain what is a free software for the majority of our users. Read more about our sustainable open-source model here.
Most of the main tasks you will perform with Pavlovia® can be carried out either in the PsychoPy application or on the Pavlovia® website. Synchronizing your files can also be done with any Git client if you prefer.
To create and log in to your account on Pavlovia®, you will need an active Internet connection. If you have not created your account, you can either
go to Pavlovia® and create your account, or
click the login button highlighted in Fig. 15, and create an account through the dialog box.
Once you have an account on Pavlovia® and are logged in, your user name should appear in the corresponding menu (tpronk in Fig. 15).
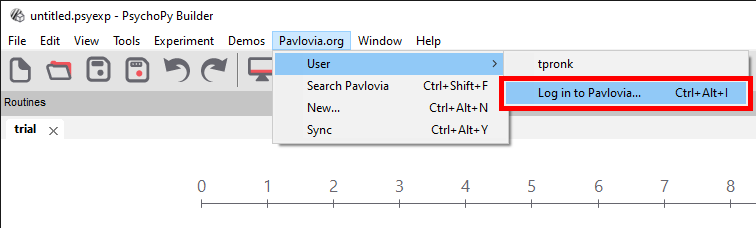
Fig. 15 Logging in on Pavlovia via the PsychoPy 3 Builder
Interacting with Pavlovia® from the Builder App
When running your study online, the globe icons will allow you to directly interact with Pavlovia® from the Builder GUI.
Fig. 16 Buttons for running an online study from the PsychoPy Builder. From left to right 1) Run study in browser directly (not project status must be “running”, not “piloting” or “inactive”). 2) Sync project/create project on Pavlovia® 3) Browse existing projects shared by others on Pavlovia® 3) Check what account you are signed in on 4) Project information (note this will only be populated if the currently opened psyexp file has been synced to pavlovia.org)
Synchronizing for the first time (creating a project)
The first time you sync your experiment, a dialog box will appear. The dialog box informs you that your .psyexp file does not belong to an existing project. Click “Create a project” if you wish to create a project, or click “Cancel” if you wish to return to your experiment in Builder. See Fig. 17.
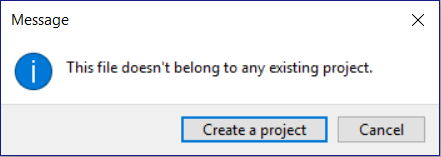
Fig. 17 The dialog that appears when an online project does not exist.
Editing project details from PsychoPy
PsychoPy versions 2020 and 2021
In versions preceding the 2022 release project details were created on the first synchronization. After clicking the “Create a project” button, another window would appear. This window was designed to collect important metadata about your project, see Fig. 18.
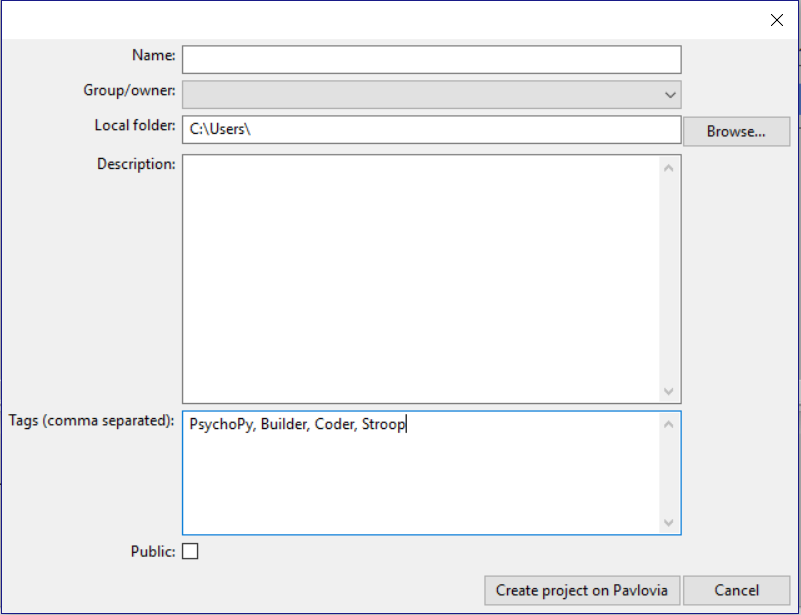
Fig. 18 Dialog for creating your project on Pavlovia.org
From this window you could add information to store your project on Pavlovia:
Name. The name of your project on Pavlovia
Group/Owner. The user or group that may manage the project
Local folder. The (local) project path on your computer. Use the Browse button to find your local directory, if required. Every file in this directory (and subdirectory) will be uploaded to pavlovia, so be sure you’ve only got files in there that are required by your experiment.
Description. A brief description of your experiment.
Tags (comma separated). These tags will be used to filter and search for experiments by keywords.
Public. Tick this box if you would like to make your project public, which means that anyone can see and clone it.
When you have completed all fields in the Project window, click “Create project on Pavlovia” button to push your experiment to an online repository. Click “Cancel” if you wish to return to your experiment in Builder.
PsychoPy version 2022
Version 2022 reduced the number of boxes that are presented on the initial sync of your project. In this version, when you select “Create project on Pavlovia” you will be presented with a dialog box that takes only two parameters:
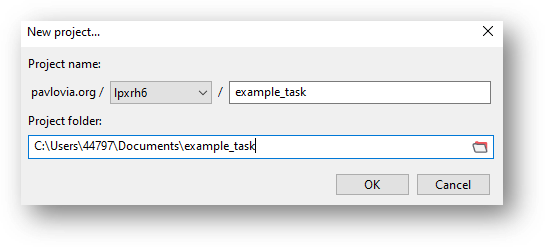
Fig. 19 The project creation dialog box in version 2022. The top row illustrates what the URL of your task will look like to your participant; all URLs will take the form of pavlovia.org/USERNAME/EXPERIMENT NAME. You can also set where the local root for your project is.
You might think “why did we reduce the number of options to control the settings of the project”. The answer to this is, we didn’t! you just have to look somewhere else. To change your project settings directly from PsychoPy Builder, You can select the project information icon. Here, you can edit all the features of your project at any time (not just on the first synchronization!).
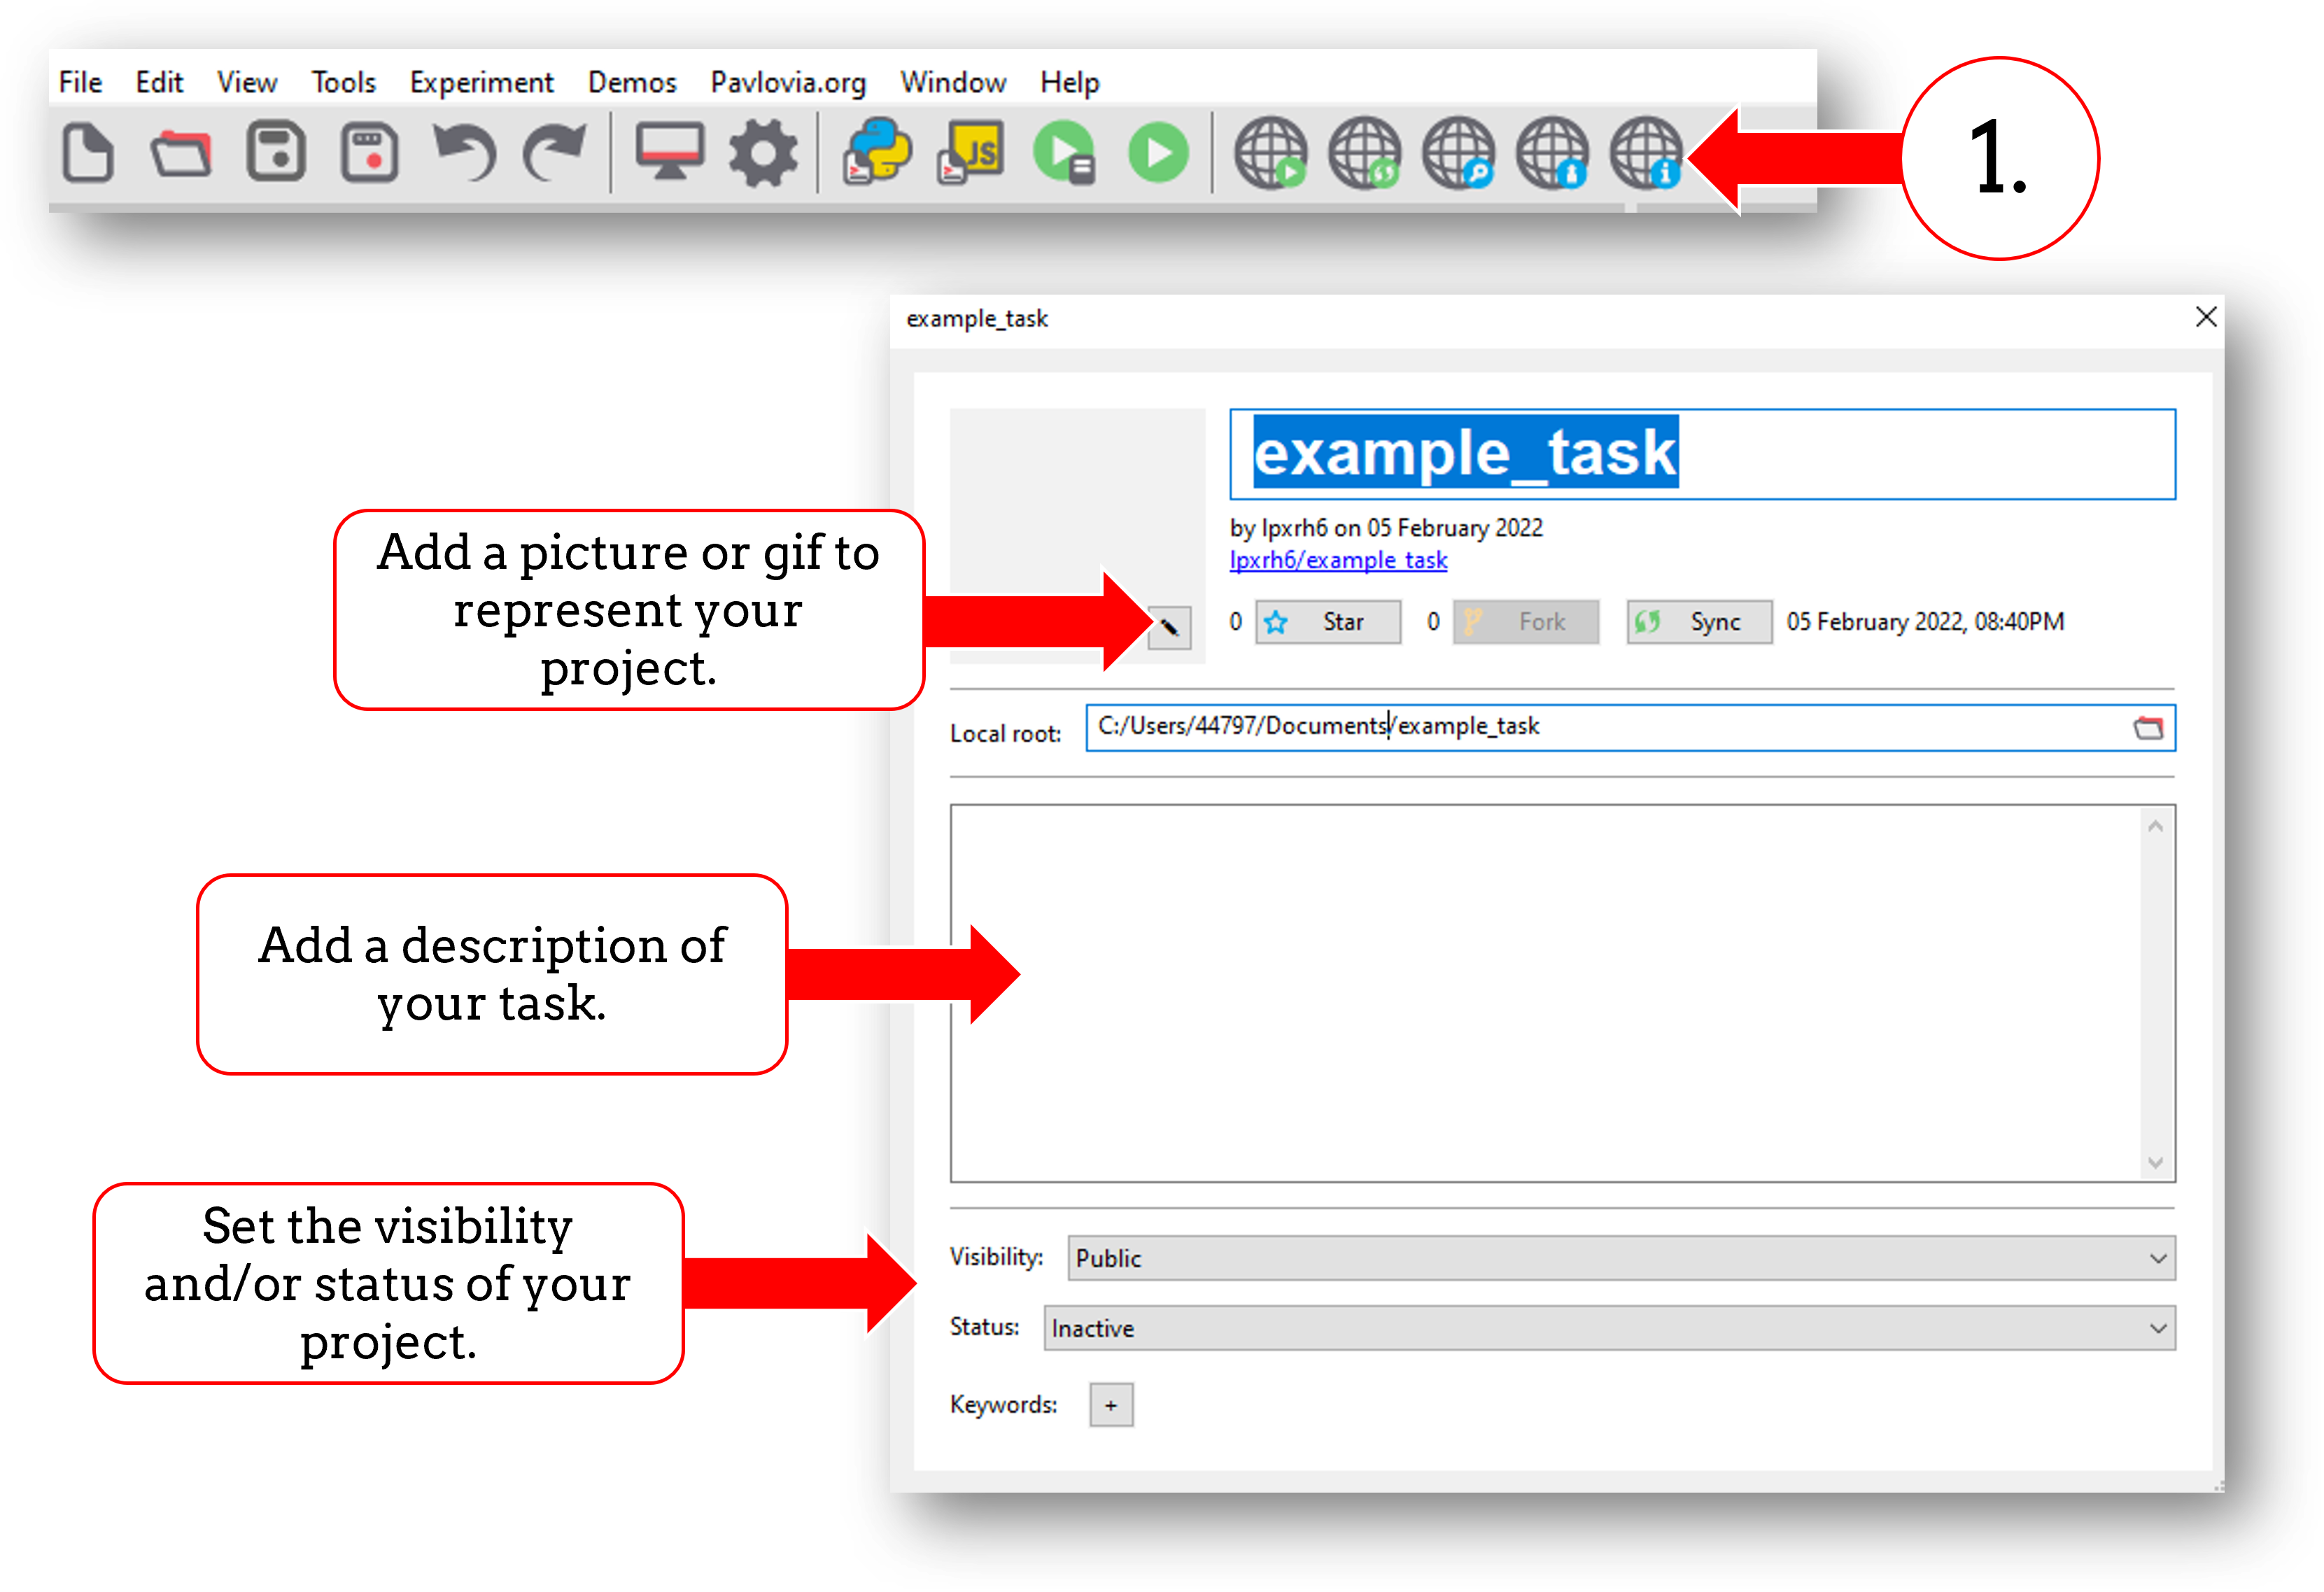
Fig. 20 The project information dialogue box.
Viewing your project on pavlovia.org
Once your experiment is online you will see your experiment in your Pavlovia Dashboard in the Experiments tab. After clicking your experiment you can set its status to “Pilotting” or “Running”. Read more about the Experiment page here.
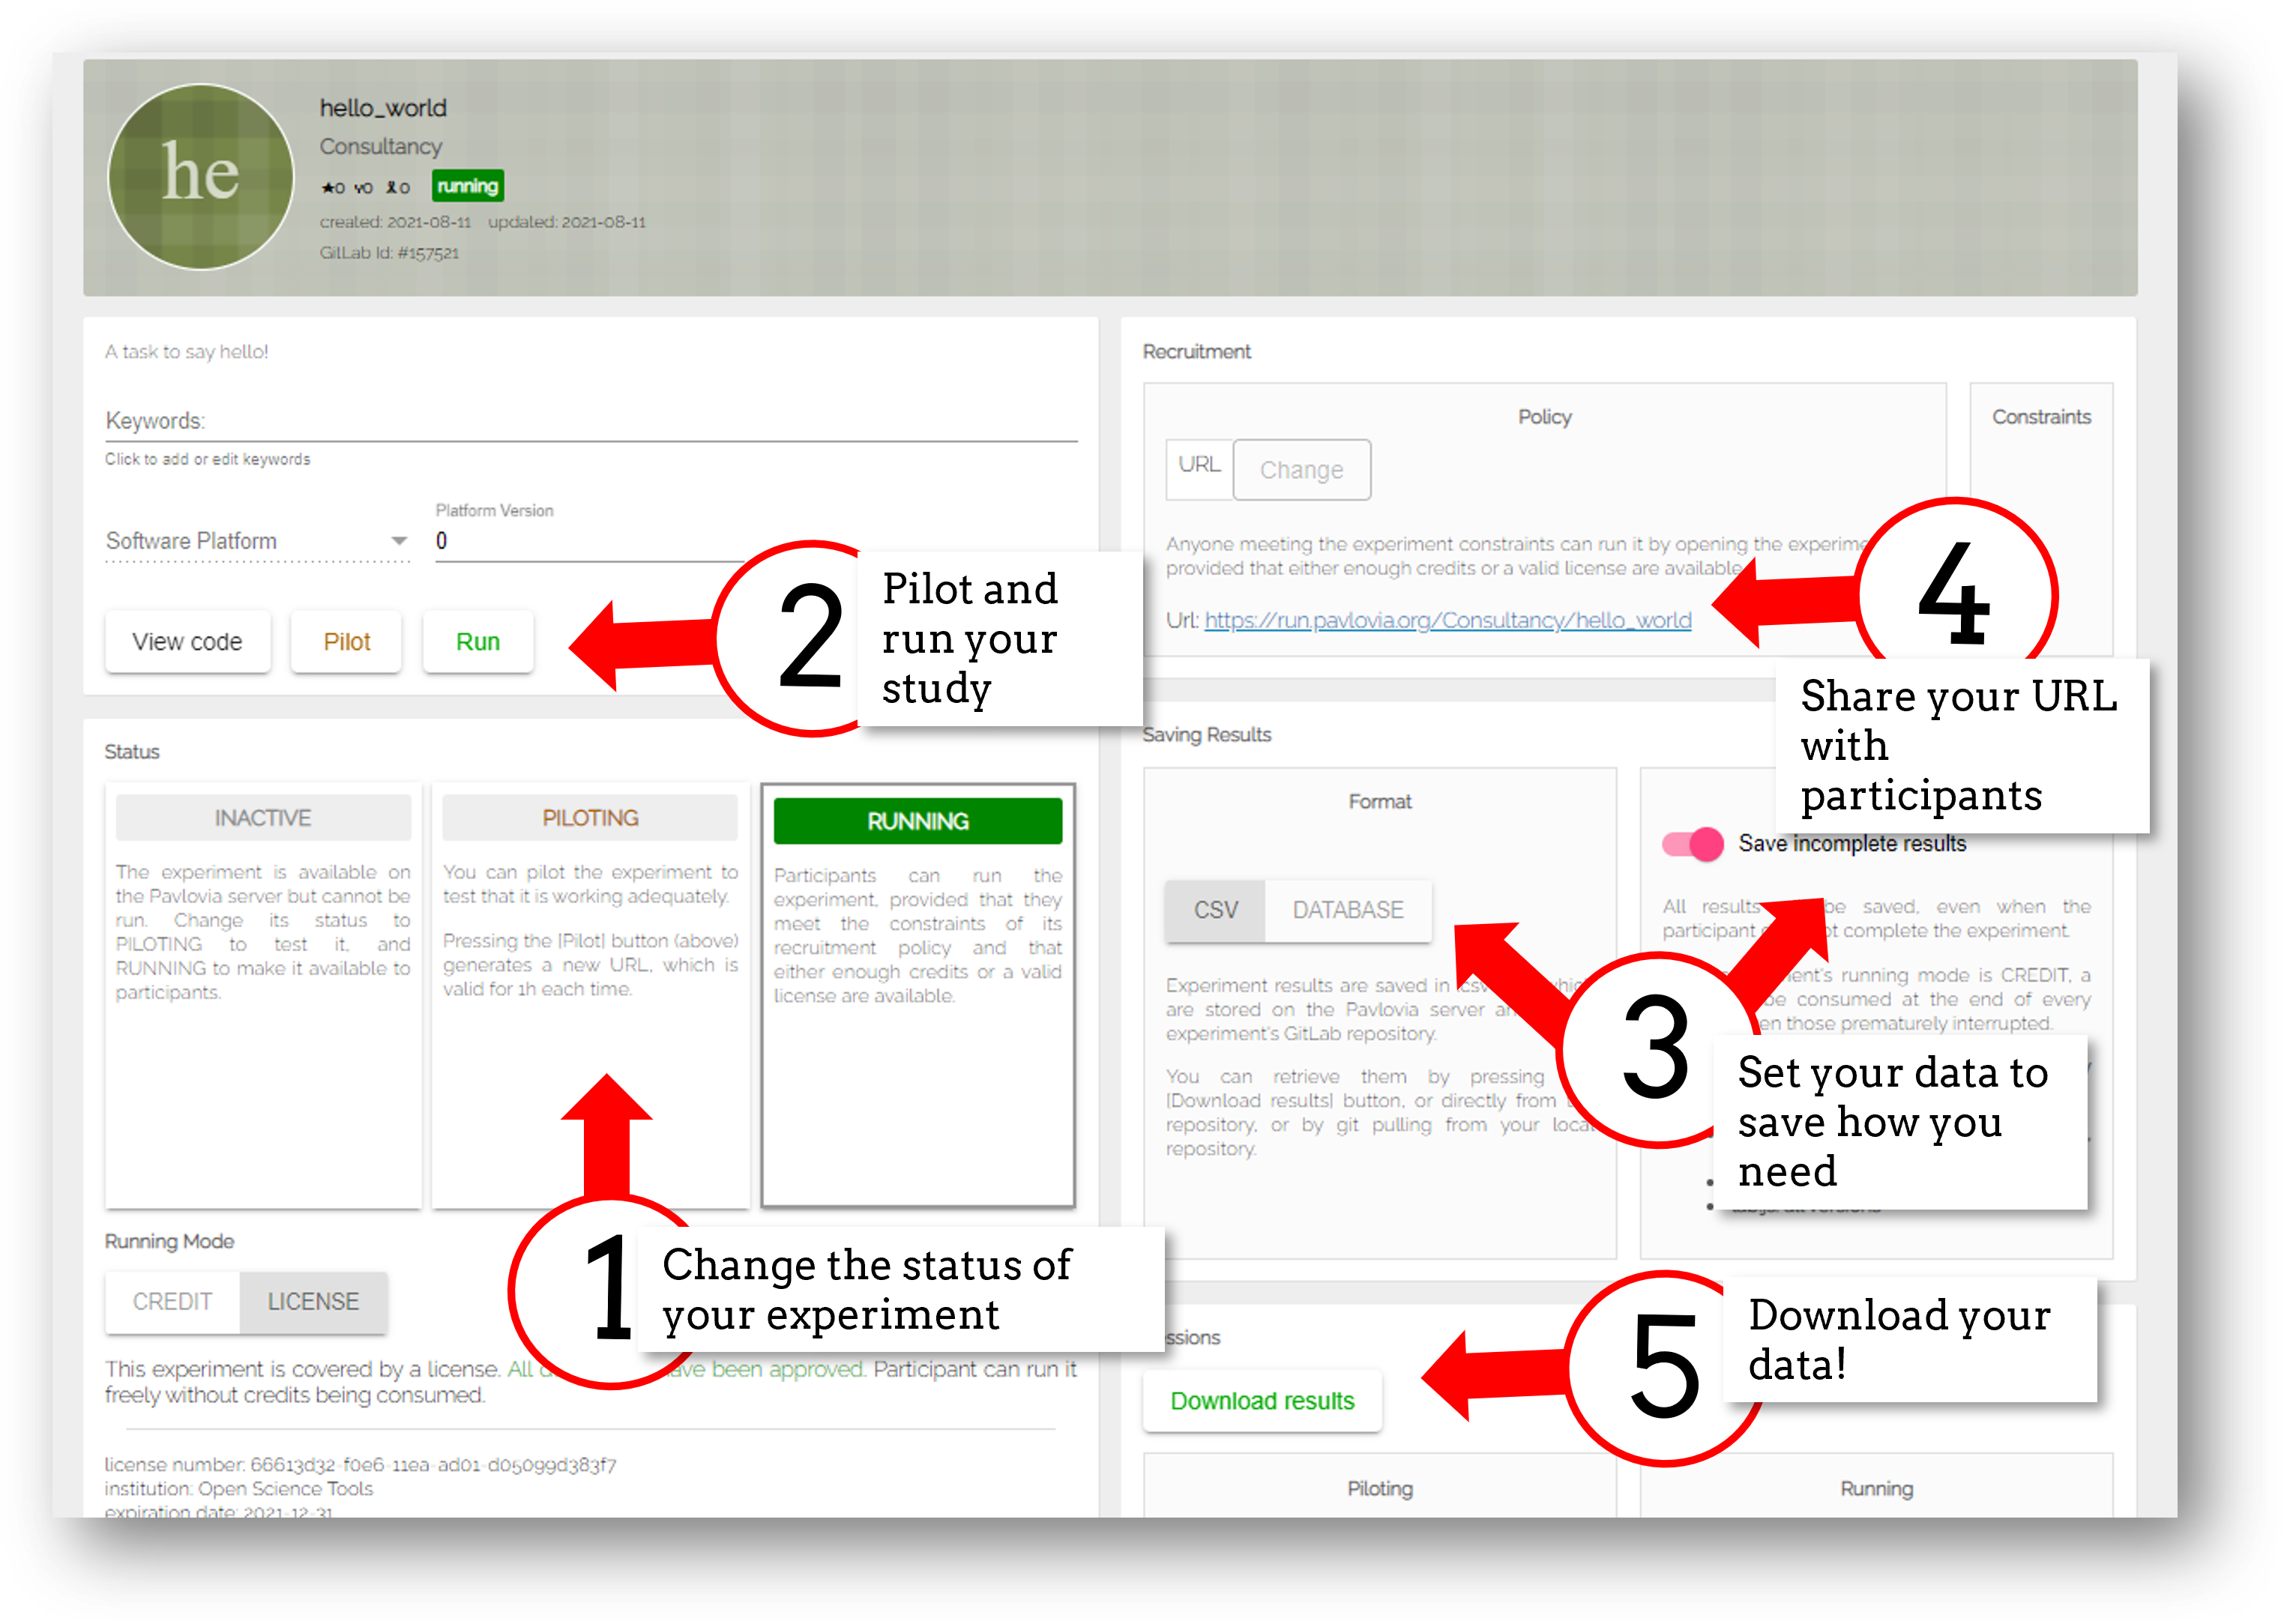
Fig. 21 Your experiment dashboard from pavlovia.org in browser.
Running your experiment on Pavlovia.org from Builder
If you wish to run your experiment online, in a web-browser, you have two options. You can run your experiment directly from pavlovia.org, as described above, or you can run your experiment directly from Builder. There is also the option to send your experiment URL; more on that in How to recruit participants and connect with online services.
To run your experiment on Pavlovia® via Builder, you must first ensure you have a valid internet connection, are logged in, and have created a repository for your project on Pavlovia®. Once you have completed these steps, simply click button 1 in Fig. 11.
Fetching your data
Once you have run your study online, there are three ways you can fetch your data:
You can use the “download results” button on your experiment dashboard in browser.
You can sync your project from psychopy builder. Syncing is bi-directional, it pushes things that don’t exist online but do locally to your online project, and pulls things that exist online in your repository but not locally (i.e. data) to your local repository.
You can select “view code” from your Pavlovia® page and look at the data file in the repository. This is handy if you only want to download a single file or two.
Note
Options 2 and 3 here will only work if you have data saving set to “csv” rather than “database”. If you are using a component that stores data files other than a csv (for example a microphone component that saves audio recordings) you should also use option 1 only.
Database or csv?
A common question researchers have is “should I use database or csv as my preferred data saving mode?” To answer this consider the following:
Do you want to make your project public eventually? and, if so, do you also want to share the data files? if the answer to this second question is no - use database, as no csv files will be stored to the underlying gitlab repository - which is made public for public project.
Do you want a single file for each participant, or all participants data concatenated into one file? for separate files use csv, for one file use database.